Imagine taking an old, grainy photo and quadrupling its resolution with just one click. That’s the promise of Photoshop’s Super Resolution, and it’s truly a game-changer for anyone who needs big, detailed images.
The problem with traditional enlargement is simple: zooming in on a photo often gives you nothing but blur. Before Super Resolution, if you tried to double the size of a shot, you either got a soft mess or had to painstakingly sharpen and detail it by hand.
Adobe realized this was a huge gap, especially for photographers and e-commerce sellers who need high-res images without a pro photoshoot. Enter Super Resolution: an AI-powered tool built into Adobe Camera Raw and Lightroom that uses machine learning to intelligently add pixels.
In this guide, you’ll learn exactly how to use it step-by-step, what it can (and can’t) do, and how to polish the results. Whether you’re a photographer, designer, or online seller, by the end you’ll be turning small photos into crisp, zoomable images right inside Photoshop.
What Is Upscale and Super Resolution in Photoshop?
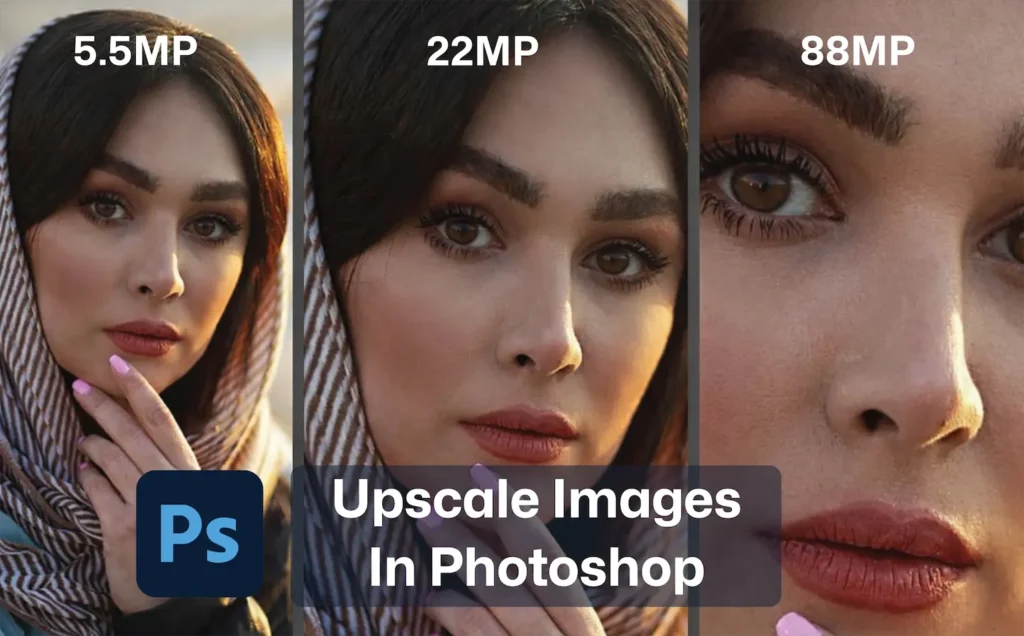
In Photoshop, “upscaling” simply means enlarging an image. Super Resolution is Adobe’s AI-powered way of doing it better. Built on Adobe Sensei, it analyzes the photo, predicts missing detail, and intelligently adds pixels instead of just stretching them. With one click, it doubles both the width and height of the image, giving you 4x the original pixel count.
Compared to old-school upscaling, Super Resolution delivers sharper edges, cleaner textures, and fewer visible artifacts, especially when working from RAW files. It’s not magic, but it’s a big upgrade over basic resize or interpolation tools.
What Are the Requirements Before Using Super Resolution?
Before using Super Resolution, make sure a few basics are in place:
- Software version: Use Photoshop 2021 or newer with Camera Raw 13.2+ installed. Lightroom and Lightroom Classic users should also be on a recent version, since Super Resolution runs through Camera Raw technology.
- Supported file types: It works with RAW files (DNG, CR2, NEF, etc.), as well as TIFF and JPEG opened via Camera Raw. RAW delivers the best results. PNG files should be converted to TIFF first.
- Hardware and storage: Super Resolution is resource-heavy. A reasonably fast CPU, enough RAM, and GPU acceleration (when available) will keep things smooth. The enhanced files are much larger, so plan for extra disk space.
- Image quality: Avoid using it on very blurry, noisy, or badly exposed images. Super Resolution performs best on already sharp, well-exposed photos that simply need to be larger.
Preparing Images Before Upscaling in Photoshop
A little prep goes a long way. Even with AI, you get the best results if you clean up the image first.
Clean the Image First (Critical Step)
Before enlarging, fix every visible issue, because upscaling will magnify flaws too.
- Reduce Noise: Apply light noise reduction in Camera Raw or Lightroom to remove grain and JPEG artifacts. This prevents noise from becoming more obvious after upscaling.
- Correct Exposure & White Balance: Fix brightness and color casts first. Clean, balanced tones upscale more naturally than dark or off-color images.
- Remove Dust & Spots: Clone out dust, sensor spots, or small artifacts now. Tiny defects turn into big distractions when enlarged.
- Crop & Straighten First: Apply final cropping and alignment before upscaling so you don’t enlarge pixels you won’t use.
Once this cleanup is done, the image is properly prepared for high-quality upscaling.
Upscale Images in Photoshop with Super Resolution in 5 Steps

Super Resolution in Photoshop lets you double your image’s width and height (4× the pixels) while keeping things sharp and detailed. Here’s a clear, step-by-step workflow you can follow without getting lost in menus.
Step 1: Open Your Image in Camera Raw
First, get your photo into Adobe Camera Raw (ACR), because Super Resolution lives there.
- From Bridge:
Right-click your image → Open in Camera Raw. - From Photoshop:
- If you open a RAW file, Photoshop usually launches Camera Raw automatically.
- If you’re working with a JPEG/TIFF already in Photoshop:
- Convert the layer to a Smart Object (Layer → Smart Objects → Convert to Smart Object).
- Then go to Filter → Camera Raw Filter.
- From Lightroom / Lightroom Classic:
Right-click the image and choose Enhance…, then you’ll see the Super Resolution option. (The interface looks a bit different, but the result is the same.)
For this walkthrough, assume the image is open in Camera Raw from Photoshop and you can see the usual exposure/contrast sliders.
Step 2: Turn On Super Resolution
Now it’s time to actually upscale the image.
- Open the Enhance dialog
- In Camera Raw, right-click the image and choose Enhance…
- Or click the three-dots icon (… ) and select Enhance.
- Enable Super Resolution
- In the Enhance Preview window, check Super Resolution.
- Camera Raw will show a small preview and update the new pixel dimensions (for example, 3000×2000 → 6000×4000).
- Apply the effect
- Click Enhance.
- Camera Raw processes the file and creates a new DNG in the same folder (usually with “_Enhanced” in the name).
- Open the enhanced file
- The new, upscaled image appears as a separate file. Open it in Photoshop if it doesn’t open automatically.
You now have a 2× larger image in each dimension, ready for detailed work or large prints.
Step 3: Inspect the Upscaled Image
Before you move on, zoom in and check the quality of the Super Resolution result.
Focus on:
- Edges and fine details
Look at product edges, logos, eyelashes, text, or any small elements. They should look crisp, not smeared or muddy. - Textures
Check fabrics, hair, skin, foliage, or surfaces. Good Super Resolution keeps textures natural, not plastic or overly “AI-generated.” - Noise and color fringing
If the original had noise or chromatic aberration, some of it may now be more visible. Note any grain, colored edges, or specks that need cleanup.
If you see small issues, fix them now in Photoshop using tools like Spot Healing Brush, Clone Stamp, or noise reduction on the upscaled file.
Step 4: Compare Before and After
Comparing the original and the enhanced image helps you judge whether Super Resolution was worth it.
- View side by side or switch tabs in Photoshop.
- Zoom to 100% or 200% on key areas (eyes, product labels, brand logos, pattern details).
- Ask a few simple questions:
- Are edges sharper?
- Do important details stand out more?
- Are there any strange patterns or artifacts that weren’t there before?
In most cases, Super Resolution delivers a cleaner, sharper result than a normal resize. If the image looks unnatural or shows too many artifacts, you still have the untouched original and can:
- Try again with a different workflow (e.g., clean noise first, then enhance), or
- Use standard resizing if this specific file doesn’t respond well.
Step 5: Continue Editing or Export for Use
Once you’re happy with the upscaled file, you can:
- Do any retouching, color grading, or sharpening on the larger image.
- Then export it as JPEG, TIFF, or WebP depending on whether it’s for web, print, or archive.
This workflow keeps everything aligned with the main goal of the process:
Upscale images in Photoshop using Super Resolution while protecting detail, avoiding artifacts, and ending up with a file that’s actually ready for real-world use.
How Much Can You Safely Enlarge Images Using Super Resolution?
How Far Can You Push Super Resolution? (Short Version)
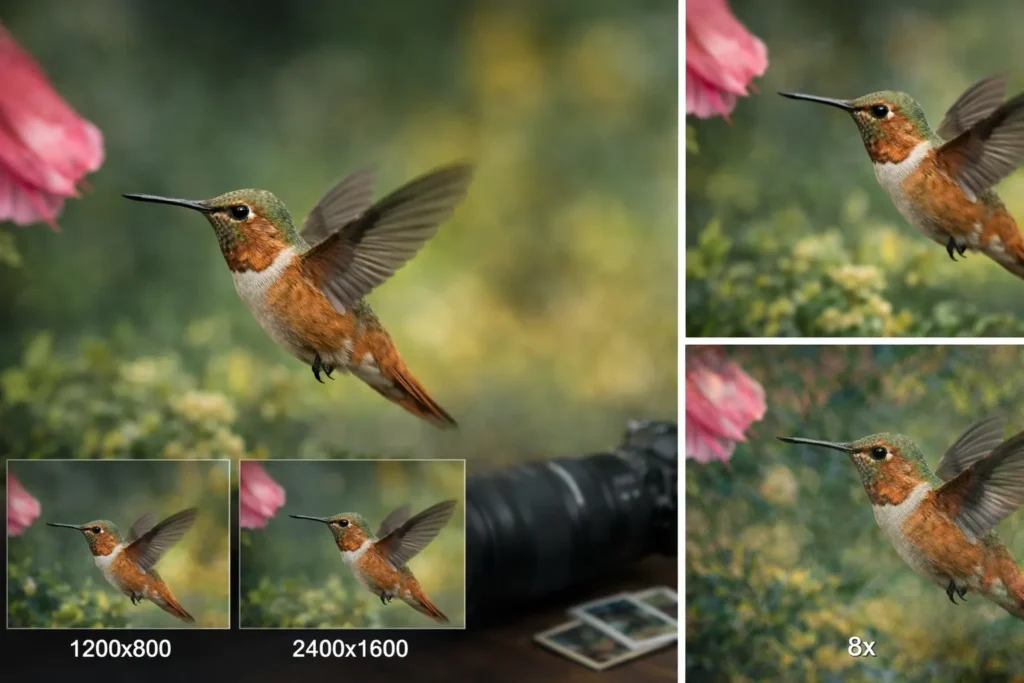
- 2× enlargement (recommended):
This is the native use of Super Resolution. It doubles width and height (4× pixels) and usually delivers clean, sharp results with minimal artifacts. For most cases, this is the sweet spot. - 4× enlargement (use with caution):
You can run Super Resolution twice (e.g., 1200×800 → 2400×1600 → 4800×3200). It works, but artifacts start to stack. Many pros prefer one 2× upscale, then light sharpening or manual cleanup instead of chaining. - Beyond 4× (not advised):
At 8× or more, results turn into AI guesswork. Texture hallucinations become obvious, and quality drops fast. If extreme enlargement is unavoidable, upscale 2×, retouch manually, then use a specialized tool for any final stretch.
Bottom line:
For e-commerce and web, 2× is ideal, 4× is the upper limit. For very large prints, rely on a single Super Resolution pass plus careful post-processing, not repeated upscaling.
Improving Results After Super Resolution
Super Resolution is powerful, but it might not be perfect. A few more steps can polish the image:
Smart Sharpening Without Overdoing It
After upscaling, your image might actually look slightly softer overall (since pixels are more spread out). Use subtle sharpening to refine it. In Photoshop:
- Go to Filter > Sharpen > Unsharp Mask. Set Amount to something like 50–100%, Radius 0.5–1px (start small), and Threshold 0. Then preview. If edges of the subject pop without obvious halos, you’re good. If you see a harsh glow around edges, dial back the amount.
- Alternatively, Smart Sharpen (Filter > Sharpen > Smart Sharpen) lets you reduce noise when sharpening – use a tiny amount of Noise Reduction (5–10%) to avoid amplifying any grain.
The key is light touch. Often a mild 50% sharpen looks better than 200%. The goal is to bring back life to the subject’s details. If the image had text or lines (like on packaging), you might use a slightly higher sharpen on those areas by selecting them with a mask. But avoid making the whole image “crunchy.”
Texture & Detail Refinement
If after Super Resolution the subject’s texture seems a bit odd, you can enhance it manually:
- High-Pass Sharpening: Duplicate the upscaled layer, apply a High Pass filter (Filter > Other > High Pass) with a low radius (1–2px), then set that layer to Overlay or Soft Light at ~20-30% opacity. This can emphasize fine details without harsh edges. Mask it to only affect the product, not the background.
- Add Grain if Needed: Ironically, a touch of photographic grain can make the image feel more real. If Super Resolution produced an almost plastic-smooth output, add a 1–2% noise layer (Filter > Noise > Add Noise) in luminosity mode and very low intensity. This gives back micro-variations that the eye loves.
- Selective Retouch: For tricky textures like skin or fabric, sometimes it’s worth hand-drawing in missing texture. This is advanced retouching territory. For example, if a sweater lost its knit pattern, one could use the Pattern Stamp or Clone Tool on a hidden layer to reinforce some visible fibers. This is not common for every photo, but for flagship products it can make a difference.
Final Color and Contrast Tweaks
Often, after upscaling, your image might need a final tonal adjustment. Check:
- Contrast/Levels: Does the product still “pop”? A slight boost in contrast or levels can add punch. Use Curves or Levels to deepen blacks and lift highlights if needed. The AI doesn’t fully know your aesthetic, so a small adjustment like +5 contrast or a subtle S-curve can help.
- Color Accuracy: Compare the upscaled image to your known color references (swatches, color checker). If a color seems off (for example, the shirt looks slightly bluer than it should), apply a targeted color correction now. Sometimes, enlarging can slightly shift or dull color; fix it here.
- Consistency: If you’re processing multiple images (like a product set or fashion shoot), ensure they have a consistent look. Compare white backgrounds – they should all be the same pure white tone. If one is greyish and another bright white, tweak them for uniformity. This brand consistency matters for the final store appearance.
After all these refinements, zoom again at 100% to make sure the detail and colors are perfect. The image should look naturally sharp, with no obvious signs of “computer generation.” A great final image will look like it could have come off a high-end camera, not like something upscaled.
Super Resolution vs Other Photoshop Upscaling Options
Before Super Resolution, Photoshop’s best built-in option was Image Size → Preserve Details 2.0.
- Preserve Details 2.0 uses light AI to protect edges and lets you control sharpening. It’s solid for small or moderate upsizes, especially when working on PNGs or flattened layers directly inside Photoshop.
- Super Resolution is more advanced and purpose-built for clean 2× upscaling, especially from RAW or JPEG via Camera Raw/Lightroom. It usually delivers crisper edges and more natural detail with less manual tweaking.
When to use what:
- Use Super Resolution when you have access to Camera Raw and want the best quality with minimal effort.
- Use Preserve Details 2.0 for quick, mild enlargements inside Photoshop or when Camera Raw isn’t available.
- For top quality, some editors upscale with Super Resolution first, then fine-tune with sharpening.
Super Resolution vs AI Upscaling Plugins
Third-party tools (like dedicated AI upscalers) can outperform Photoshop for extreme enlargements (4×–6×) or tricky details like faces, text, or artwork. They offer more control but add cost and extra steps.
Common Mistakes When Upscaling Images in Photoshop
Even with Super Resolution, you can slip up. Watch out for these frequent errors:
- Upscaling Noisy Images Without Cleanup: If you throw a grainy image into Super Resolution, you’ll just get a super-grainy large image. Always denoise first.
- Over-Sharpening After Upscaling: Too much sharpening is easy to do. It can make hair or skin look etched or introduce “ringing” artifacts. Remember: Sharpen carefully.
- Expecting it to “Fix” a Bad Photo: Super Resolution won’t repair motion blur or out-of-focus errors. If the photo itself is ruined, enhancement can’t conjure detail.
- Upscaling Repeatedly: Each upscale adds potential artifacts. Don’t upscale 2× twice by default – go slower, or stop at one upscale.
- Saving in the Wrong Format: If you super upscale and then save as a low-quality JPEG for quick share, you undo all the gains. Always use high-quality export.
- Ignoring Color Profiles: Make sure to keep the correct color space (sRGB for web). Changing profiles during upscaling can alter colors.
By being mindful of these mistakes, you ensure your final image is a step up – not a step back.
Export Settings for High-Resolution Images
Finally, how you save the big image makes a difference:
Best File Formats After Upscaling
- JPEG: Still the king for photos. Use it for the final product image if it’s for web. Make sure to keep the quality slider up (80–90%). This preserves nearly all detail.
- TIFF: If you plan to do more editing or want a master copy, save a 16-bit TIFF. This keeps all the data intact (no compression), at the cost of huge file size. It’s great for archival. Only convert to JPEG at the very last step for output.
- PNG: Use only if you need lossless (text/logos) or transparency. Otherwise, PNG of a photographic image will be very large.
- WebP/AVIF: If your platform supports it, these next-gen formats are even better than JPEG for photos. They can reduce file size by another ~30% at similar quality. Many image processing pipelines can output WebP easily now. Consider it especially if site speed/SEO is a priority.
Compression Settings That Preserve Quality
For JPEG, aim for minimal compression. We learned earlier that 80% quality is a sweet spot: file size is smaller, but the human eye barely notices the difference. For safety, I often use 85–90% and check the image at 100% zoom. You should see no new blockiness. If the file is still huge, try 80% and recheck – usually it’s fine for e-commerce.
If you have large e-commerce platforms (like 100+ products), using a tool like Adobe Photoshop’s “Save for Web (Legacy)” can help automate exporting many images with consistent settings. Or Lightroom’s export with quality slider. Just double-check one sample for each product type.
After exporting, always do a final sanity check: open the saved JPEG and compare to the in-Photoshop view. Make sure no unexpected artifacts crept in due to compression.
Conclusion
Photoshop’s Super Resolution makes high-quality image enlargement finally practical. Instead of stretching pixels, it uses AI to rebuild detail, delivering sharper edges and cleaner textures, especially when used on well-prepared images.
The best results come from a smart workflow: clean the image first, stick to a single 2× upscale, apply light sharpening, and export with high-quality settings. Used this way, Super Resolution can turn small or older photos into crisp, zoom-ready images that look natural and professional, not artificially enlarged.
It won’t fix a bad photo, but in the right hands, it’s a powerful tool that saves time, reduces reshoots, and upgrades image quality for web, e-commerce, and print.