I’ve learned that photos only look as good as the details you capture. Little things like rumpled fabric or a wrinkled shirt can distract from your main subject.
Those creases might seem minor on set, but once you open the image, they instantly draw the eye. Photography experts often say wrinkles are visual noise — they steal attention from what truly matters.
Ironing before a shoot helps, but learning how to smooth fabric in Photoshop makes it even easier to achieve that crisp, professional look. It’s the fastest way to “iron” digitally and get perfectly polished results without touching a steamer.
Below is my personal, step-by-step guide for smoothing fabric in Photoshop and removing wrinkles naturally. These techniques come from years of editing everything from shirts to product banners.
I’ll show you the tools that work, why they matter, and the subtle tricks that make a huge difference. By the end, you’ll know exactly how to turn a wrinkled garment into a smooth, studio-quality image.
Understanding The Tools

Photoshop offers several healing tools that can “iron” out fabric. These tools sample surrounding pixels and blend them into the area you’re correcting so the texture and lighting remain consistent.
Here are the ones I use most:
| Tool | What it does | When to use it |
|---|---|---|
| Spot Healing Brush | Automatically samples nearby pixels and paints over wrinkles with a single brush stroke. | Great for isolated creases – quick and simple. |
| Healing Brush | Lets you choose a specific sampling point (Alt/Option‑click) and paint over the wrinkle. | When you need more control over where the texture comes from and want to avoid odd colour changes. |
| Patch Tool | Allows you to draw a selection around a wrinkled area and drag it to a smooth section. Photoshop then blends the textures together. | Ideal for large areas with multiple wrinkles or crisp folds. |
| Frequency Separation | Separates texture and colour into different layers so you can blur wrinkles without losing the cloth’s weave. | Advanced technique for full‑garment retouching or complex fabrics. |
| Other tools | Clone Stamp, Liquify, Dodge/Burn. | Finishing touches – fix stray fibres, straighten seams or add dimension. |
Prepping your image
-
Iron and steam before you shoot. The less you need to retouch, the better. I always keep a handheld steamer on set.
-
Work non‑destructively. In Photoshop, open your image and duplicate your background layer (Ctrl/Cmd + J). This ensures you can always revert to the original.
-
Zoom in and inspect. Scan the garment for big folds versus tiny crinkles. Knowing what you’re dealing with will determine which tool to reach for.
Step‑by‑Step Techniques
Learn how to smooth wrinkles in fabric using Photoshop with easy, pro-level techniques. From quick fixes like the Spot Healing Brush to advanced methods like Frequency Separation, this step-by-step guide helps you make any garment look clean and flawless, no ironing needed!
1. Spot Healing Brush – Tackle Small Creases

For tiny, isolated wrinkles, the Spot Healing Brush is my first stop. It automatically samples nearby pixels and paints over the crease, blending texture and lighting so the fix is invisible. To use it:
-
Select the Spot Healing Brush Tool from the toolbar. In the options bar, set Mode to Replace to preserve the fabric’s texture.
-
Choose a brush size that’s slightly larger than the wrinkle. Set hardness near 0 % for soft edges.
-
Paint over the wrinkle. Photoshop picks the sampling pixels for you. Try different healing types (Content‑Aware, Create Texture or Proximity Match), Content‑Aware often works best for clothing.
-
Repeat and vary your strokes. Short strokes from different directions reduce the chance of creating patterns. If you notice repeating textures, change brush size or hardness.
2. Healing Brush – more control for tricky areas

When the Spot Healing Brush leaves artefacts or the fabric’s pattern is complex, switch to the Healing Brush. This tool lets you choose the exact area to sample from:
-
Select the Healing Brush Tool from the toolbar. Set Sampled as the Source.
-
Alt/Option‑click on an area of smooth fabric with matching colour and brightness. This defines your sample.
-
Paint over the wrinkle just as you would with a brush. Because you picked the source yourself, you avoid unwanted colour shifts.
-
Resample often. Changing the sample point every few strokes prevents repeating patterns and maintains natural texture. Patch Tool – fix large folds
3. Patch Tool – fix large folds

For bigger wrinkles or multiple creases, the Patch Tool saves time. It blends entire patches of pixels rather than individual brush strokes:
-
Choose the Patch Tool (it may hide behind the Healing tools). In the options bar, set the mode to Normal and check Destination so your selection replaces the target area.
-
Draw a lasso around the wrinkled area. Keep the selection tight to avoid dragging unwanted parts of the garment.
-
Click and drag the selection onto a smooth area of fabric. Photoshop will blend the textures so the wrinkle disappears.
-
Fine‑tune diffusion. The Diffusion slider controls how soft the edges blend. Lower diffusion works for detailed textures, higher diffusion for smooth fabrics.
4. Combine Patch and Healing for perfection
When I’m retouching entire outfits, I like to patch out the large folds first, then clean up smaller imperfections with the Spot Healing Brush. Zenith Clipping, a professional editing service, recommends this combined approach for best results.
5. Advanced: Frequency Separation – Smooth Texture Without Losing Weave
If you need to remove wrinkles across an entire garment while keeping the original texture, frequency separation is a powerful technique.
It separates your image into two layers: one that holds colour and tone (low frequency) and one that holds fine detail like the cloth weave (high frequency).
Here’s my workflow:
-
Duplicate the background twice. Name the lower copy Colour and the top copy Texture. Hide the Texture layer for now.
-
Blur the Colour layer. With Colour selected, go to Filter > Blur > Gaussian Blur. Move the slider until the wrinkles disappear but the overall shapes remain.
-
Set up the Texture layer. Make the Texture layer visible. Choose Image > Apply Image. Set Layer to Colour, Blending mode to Subtract, Scale to 2 and Offset to 128. This isolates the fine texture.
-
Change the Texture layer’s blending mode to Linear Light. Your image now looks like the original, but texture and colour are on separate layers.
-
Use the Lasso Tool on the Colour layer. Feather your selection (20‑40 pixels) and apply a small Gaussian blur to smooth wrinkles without affecting texture. Repeat over all wrinkled regions.
-
Fine‑tune with Dodge and Burn. If parts of the garment look flat after blurring, use Dodge/Burn on separate layers to restore highlights and shadows.
Frequency separation has a learning curve, but once mastered it lets you smooth large areas quickly without creating that plasticky, over‑retouched look.
Best practices for natural‑looking results
-
Vary your brush sizes and hardness. A large soft brush blends edges, while a smaller harder brush can preserve seams.
-
Avoid repeating patterns. Resample frequently and change brush direction.
-
Match brightness and colour. Always sample from areas with similar luminosity to prevent visible tonal shifts.
-
Zoom in and out. Work at 100 % zoom to see details, then zoom out to ensure the overall garment still looks natural.
-
Work on separate layers. This lets you lower opacity or mask areas where your edit looks too heavy.
If you want to dive deeper into professional editing methods that make fabrics look smooth and natural, check out this detailed wrinkle-removal guide.
Example edit
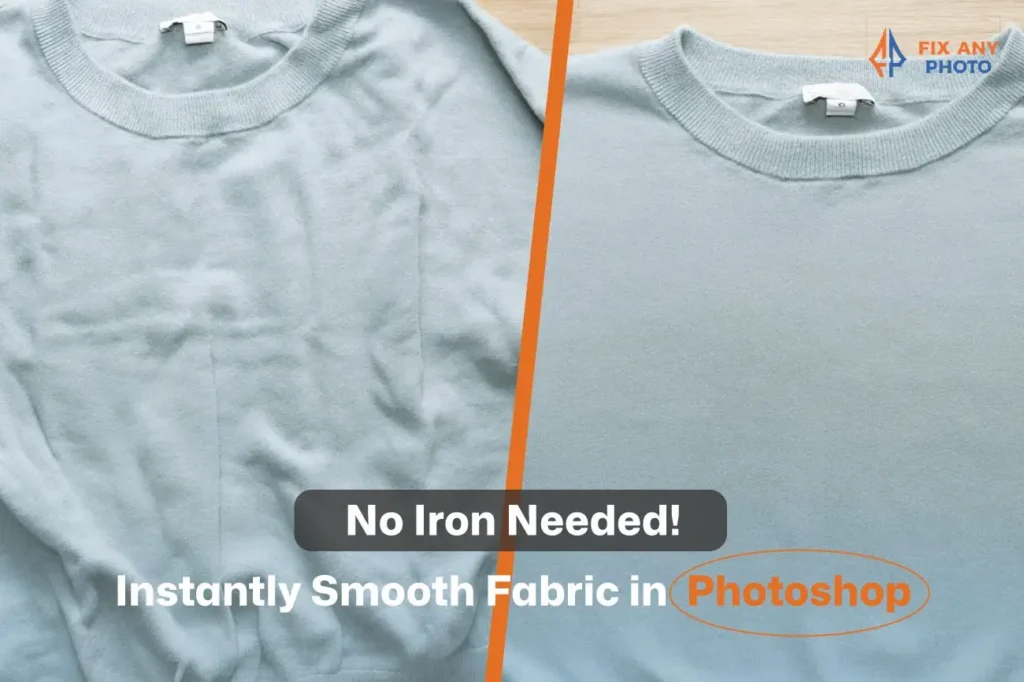
The image below shows a simplified before‑and‑after demonstration. On the left is a wrinkled fabric sample; on the right the wrinkles have been softened to illustrate the effect of the Healing Brush.
This isn’t a real garment but a visual representation of how the smoothing process removes distracting creases while preserving overall texture.
Final thoughts
Smoothing wrinkles in Photoshop isn’t about making clothes look unnaturally perfect, it’s about presenting your subject in the best possible light.
Whether I’m retouching a team jersey for my pickleball store or cleaning up a banner for an instructional video, these techniques let me remove distractions and keep viewers focused on what matters.
Start with the simple Spot Healing Brush for little folds, work your way up to the Healing Brush and Patch Tool for larger areas, and explore frequency separation when you need to retain fabric texture across an entire garment. With a bit of practice and patience, you’ll be “ironing” your images like a pro in no time!