I’ll never forget the first time I tried ghost mannequin editing. I shot a shirt on a mannequin, erased the dummy in post, and suddenly the garment looked alive, floating on its own.
That’s the magic of ghost mannequin photography: clean, 3D-looking product shots that let shoppers imagine the fit without distractions.
In e-commerce, photos make or break sales. A visible mannequin or messy background can kill trust fast.
Ghost mannequin editing fixes that, giving you sharp, consistent images that highlight fabric, shape, and detail—at a fraction of the cost of hiring models.
In this guide, I’ll show you how it works, why it’s powerful, and the steps I use to create it in my workflow.
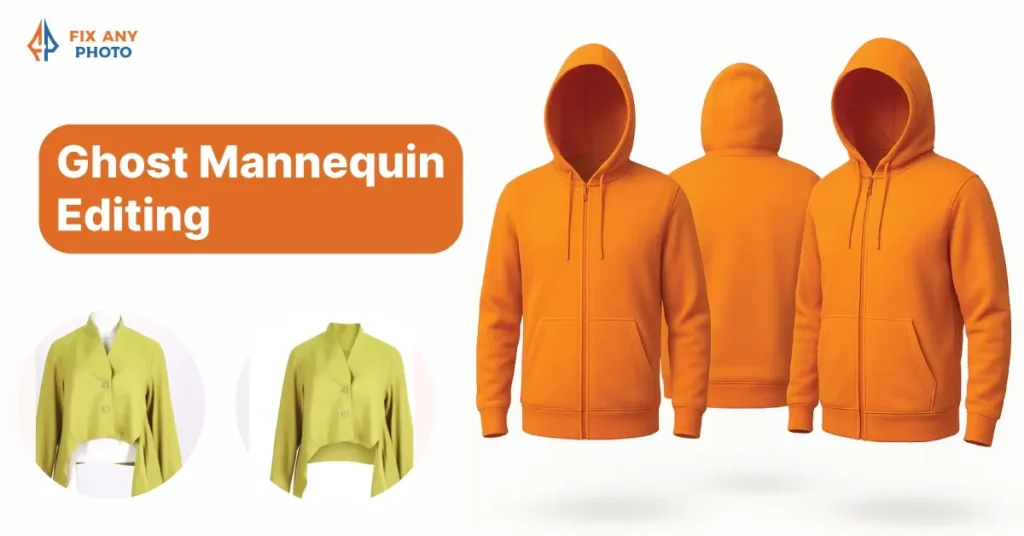
Ghost Mannequin Editing 101: What It Is & How It Works

Think of it as a little photo magic trick. You start by shooting clothes on a mannequin to capture structure and fit. Then, in editing, the mannequin disappears.
By combining multiple shots, like the front of a shirt plus the inside collar, you get a seamless, 3D image that looks as if an invisible model is wearing it.
That’s why people also call it the invisible mannequin effect, hollow man, or simply 3D clothing retouching.
Photography vs. Editing – Two Different Stages
It’s easy to mix them up, but shooting and editing require totally different skills.
During photography: you’re setting up lighting, styling garments, and choosing camera angles.
During editing: it’s all about masking, compositing layers, and blending details like inner labels or lining.
A polished result usually comes from at least two shots, one on the mannequin, one of the inside details. This way, you capture everything cleanly first, then refine it on the computer without rushing.
Why Brands Love the Effect
Clean, distraction-free images
Clients often tell me how much more professional their catalog looks once the mannequin is gone. Without extra clutter, the customer’s eye goes straight to the fabric, stitching, and silhouette.Realistic depth & shape
Flat lays are great for patterns, but they don’t show how fabric falls on the body. These “floating” photos give shoppers a clear sense of volume and drape, reducing uncertainty and returns.Consistent branding
Using the same mannequin, lighting, and crop across dozens of items creates a unified look. That consistency builds trust and helps buyers compare products at a glance.Cost-effective
Hiring models for every item adds up quickly. Mannequins are reusable, and editing services often cost just $1–$2 per image, much cheaper than a full model shoot.Boosts shopper confidence
Detailed views of collars, tags, and linings help buyers know exactly what they’re getting. The clearer the image, the fewer surprises, and the fewer returns.
Types of Ghost Mannequin Editing

Not all ghost mannequin edits are the same. Depending on the type of clothing, editors use different techniques to make the final image look polished and realistic.
Let’s break down the four most common types you’ll see in eCommerce.
1. Neck Joint Editing

What it is: Neck joint editing is when we remove the mannequin’s neck and fill in the missing part of the clothing, usually by adding the inside label or collar.
When it’s used: Shirts, blouses, jackets, and dresses with collars.
Why it matters: Customers want to see how the inside neckline looks, especially if it has branding or unique stitching. Without this step, the garment looks incomplete.
Challenges & Best Practices:
- Always take a separate photo of the inner collar or label, this will be stitched into the final image.
- Watch out for mismatched lighting between the two shots. If one is brighter than the other, the final edit will look fake.
- Keep edges smooth using the Pen Tool or layer masks in Photoshop.
Pro tip: I once had a client who skipped the inner collar shot during the photoshoot. We had to improvise by recreating the neckline from scratch in Photoshop – not fun! If you’d like a step-by-step breakdown of how this process works and how to make your results look more natural, check out this detailed guide on mastering neck area edits. Trust me, it’ll save you a ton of time on your next project.
2. Bottom Joint Editing

What it is: This technique is used to complete the bottom part of a garment after the mannequin or model is removed.
When it’s used: Pants, skirts, shorts, and long dresses.
Editing Tips for Clean Results:
- Pay close attention to symmetry. Uneven hemlines make the product look sloppy.
- Use feathering in your selections so the edges don’t look too sharp or “cut out.”
- If the garment has layers (like pleats or ruffles), keep them natural, over-editing can make them look flat.
Pro tip: For dresses, make sure the fabric flow looks natural. Sometimes I’ll use Photoshop’s Warp tool to gently “lift” folds so the garment hangs as it would in real life.
If you’d like to dive deeper into how to refine and extend garment edges professionally, you can read this complete Photoshop walkthrough for finishing garment bottoms.
3. Sleeve Joint Editing

Long-sleeve clothing often looks awkward without proper editing. If you just cut out the mannequin, sleeves can dangle shapelessly and ruin the overall look.
To really understand how to fix these sleeve issues and make your edits look natural, check out this step-by-step guide on refining sleeve joints in Photosho.
Common Mistakes:
- Sleeves pointing in different directions.
- Folds that look too stiff or too flat.
- Forgetting to capture extra shots of the inside sleeve.
Best Practices:
- Always shoot an additional photo showing the inside of the sleeve.
- Keep the armholes clean and rounded – this small detail can make or break the edit.
- Add subtle shadows to give depth and prevent a “floating paper cutout” look.
4. 3D Ghost Mannequin Editing

What sets it apart: Standard ghost mannequin editing is mostly 2D, it makes the garment look filled out but still flat. 3D ghost mannequin editing takes it up a notch by creating a more realistic, three-dimensional effect.
When to use it: High-end fashion and luxury brands often use 3D ghost mannequin for coats, blazers, and premium dresses where fabric texture and depth are key selling points.
Benefits:
- Adds volume and realism, making clothes look high-quality.
- Perfect for detailed products with inner linings or layered fabric.
- Works great in catalogs where premium presentation matters.
Example: I once edited a line of tailored blazers for a boutique brand using 3D ghost mannequin editing.
The difference was night and day, suddenly the blazers looked like they were styled in a high-end showroom instead of a basic product photo.
If you’d like to dive deeper into how this advanced editing process creates lifelike depth and professional texture, check out this in-depth breakdown of 3D mannequin editing techniques.
Step‑by‑Step Process: From Photo Shoot to Final Edit

After years of trial and error, I’ve developed a workflow that consistently delivers high‑quality ghost mannequin images. Here’s a detailed breakdown to help you replicate the process.
Planning & Preparation
Select the right mannequin. Choose a mannequin that matches your target demographic in size and posture. Modern ghost mannequins have removable arms, necks and torsos, allowing you to detach parts for easier editing. Adjustable mannequins simplify fitting and reduce retouching time.
Product prep. Steam or iron garments and remove tags or loose threads so they look pristine. Keep pins, clips and tape on hand to adjust the fit without causing wrinkles.
Studio setup. Use a clean white or light gray backdrop to simplify masking later. Mark positions on the floor for the mannequin, camera and lights to maintain consistent framing across multiple shots.
Lighting. Soft, diffused lighting is essential. Position long strip softboxes or LED panels slightly to the side to avoid harsh shadows and create gentle highlights that add volume.
Camera settings. Place the camera at mid‑height of the garment to achieve a neutral perspective and use manual white balance for accurate colors. A high‑resolution camera and quality lens help capture sharp details and reduce editing time.
Photography Stage
Capture front, back and side views. Photograph the garment from all necessary angles to tell a complete product story. Don’t forget close‑ups of interesting details like buttons or stitching.
Turn the garment inside out. After you’ve captured the exterior, flip the garment inside out and photograph the interior, focusing on the neck label, lining or any inside features you plan to include in the final composite.
For 360° projects: Place the mannequin on a rotating turntable labeled with markers every 15° (for 24 frames) or 10° (for 36 frames). Keep lighting and camera settings identical throughout. Capture the garment at each position. Consistency is critical; use a tripod and mark the floor to avoid shifting the camera.
For more inspiration on creative ways to photograph garments from different angles, check out this guide on flat lay clothing photography to see how layout and composition can elevate your shots even further.
Editing Stage – Creating the Ghost Effect
Import & organize files. Create separate layers for each shot (front, back, interior). Label them clearly so you can align elements later.
Remove the mannequin. Use selection or masking tools to isolate the garment and mask out the mannequin. Pay special attention to complex edges like collars, sleeves and hems to maintain a natural shape.
Merge interior details. Bring the inside shot layer into the main file and align it with the outer edges of the garment. Use layer masks, feathering and blending modes to seamlessly integrate the interior with the main shot.
Refine & retouch. Smooth wrinkles gently and correct any distortions. Adjust color balance, contrast and saturation so the garment appears vibrant but realistic. Avoid over‑editing; preserving natural texture is key.
Final touches. Crop all images to a consistent ratio, add subtle shadows or reflections if desired, and export in multiple resolutions for web and print.
Post‑Production Tips
Consistency is key. Build preset templates for cropping, color profiles and export settings so every product looks similar.
Non‑destructive editing. Use adjustment layers or smart objects to maintain flexibility; this allows you to tweak color or composition later without degrading image quality.
Quality control. Zoom in to check edges and seams for artifacts, and compare different views of the same garment to ensure they match.
Batch processing. For 360° sequences, process images as a group to ensure consistent color and exposure across all frames.
If you’re deciding which visual style best suits your brand, you might find this comparison between mannequin, flat lay, and model photography helpful — it breaks down the strengths of each method so you can choose the right approach for your next shoot.
Benefits of Ghost Mannequin Editing for Brands

The most immediate benefit is improved presentation. Ghost mannequin images provide a distraction-free view that highlights fabric texture, fit, and details. Clear visuals build consumer trust, which in turn boosts conversion rates and reduces hesitancy.
Improved Customer Experience & Reduced Returns
By showing garments from multiple angles and including interior details, ghost mannequin photos help shoppers visualise how clothes will look on their bodies, leading to fewer surprises and returns.
Brands often report lower return rates because customers feel more confident in their purchase.
Consistency & Brand Cohesion
Uniform lighting, backgrounds, and cropping create a cohesive catalog that feels intentional and curated. This consistency reinforces brand identity and makes shopping more intuitive, boosting loyalty and trust.
Cost & Time Efficiency
Ghost mannequin editing drastically reduces the need for models and elaborate photo shoots. For a detailed breakdown, check out our guide on ghost mannequin editing costs. Service providers charge between $0.60 and $1.50 per image for editing, while professional ghost mannequin photography can range from $25 to $55 per image.
Increased Conversions & SEO Benefits
High-quality images contribute to better search rankings because search engines prioritise pages with engaging visuals. When you compress files appropriately, ghost mannequin photos load quickly on mobile devices, improving user experience and SEO.
If you’d like to explore how 3D editing techniques can elevate these results even further, take a look at this complete guide to advanced ghost mannequin workflows. It breaks down how 3D ghost mannequin editing adds depth and realism that can significantly boost engagement and conversions.
Challenges & Common Mistakes (and How to Avoid Them)

Inaccurate Fit & Preparation
Ill‑fitting garments ruin the effect. Visible pins or wrinkles distract from the product and make editing harder.
Always choose a mannequin that matches your garment’s size and use pins, clips and tape to achieve a natural fit. Steam or iron garments beforehand to remove wrinkles.
Reflective Materials & Lighting Issues
Shiny fabrics like satin or sequins can reflect dark areas, resulting in dull patches or color shifts. Uneven lighting produces inconsistent hues and shadows.
To avoid these problems, position large light sources close to the subject to minimize reflections and control light direction. Calibrate your monitor and use manual white balance for accurate color reproduction.
Post‑Production Pitfalls
Over‑editing is a common mistake. Excessive smoothing or reshaping can make garments look fake. Instead, preserve natural texture and shape while removing only distracting wrinkles.
Misaligned seams occur when the interior shot isn’t aligned precisely with the exterior; always use high‑resolution images and zoom in to ensure perfect alignment.
Ghost mannequin editing is labor‑intensive, so consider outsourcing when volume is high to maintain quality and meet deadlines.
Color Inaccuracies & Device Calibration
Different devices display colors differently, which can mislead customers. Regularly calibrate your monitors using color checker cards and update your editing software’s color profiles.
Use consistent color management across your workflow to maintain accurate hues.
If you want to learn more about common editing errors and how to avoid them, check out this detailed guide on avoiding ghost mannequin retouching mistakes for practical tips and real examples.
Invisible Mannequin vs. Other Product Photography Styles

Flat Lay vs. Invisible Mannequin
Flat lay is all about creativity, you place garments flat on a surface, shoot from above, and often add props for lifestyle storytelling. It’s simple, affordable, and highly engaging for platforms like Instagram.
The invisible mannequin effect, on the other hand, focuses on form and structure. By removing the mannequin in post-production, you get a clean, floating look that highlights fit and fabric.
Flat lay is perfect for mood-driven content, while hollow man editing shines on product pages and catalogs where professionalism and accuracy matter most. Many brands combine the two for a balanced visual strategy.
Live Models vs. Hollow Man Editing
Traditional shoots with live models add personality, movement, and lifestyle appeal, but they’re expensive and time-consuming. Editing out mannequins offers a middle ground: you capture the true shape of clothing without hiring talent, ensuring consistency across your entire catalog.
Live models still work well for accessories, electronics, or campaigns where human interaction is key. But for apparel at scale, 3D apparel shots provide a more efficient solution.
Cost Considerations
Editing Fees
Simple neck-joint edits: around $0.60 per image
Medium complexity (multiple areas): about $0.99
Complex composites: $1.50+ per image
Many providers also offer bulk discounts or monthly packages for ongoing projects.
Photography Sessions
Professional studio shoots using this technique typically run between $25–$55 per photo, depending on garment complexity, angles, and whether styling/steaming is included. For large orders, costs often drop to $30–$35 per image.
Budgeting & ROI
When planning your budget, factor in equipment (camera, lighting, mannequin), the number of products, and whether editing will be in-house or outsourced.
Most brands see it as an investment rather than a cost—because polished, distraction-free images reduce returns, build trust, and boost conversions.
Keep an eye on metrics like product page engagement, conversion rates, and return percentages to measure the payoff.
Outsourcing vs. In-House Editing – Which Path Should You Choose?

If you’re juggling a massive catalog, outsourcing invisible mannequin editing can feel like a lifesaver. Professional retouching agencies work with skilled editors and advanced tools, tackling complex masking, color correction, and compositing at scale.
Many promise lightning-fast turnarounds (sometimes within hours), and bulk pricing often drops as low as $1 per image. Best of all, it frees your team to focus on creative direction and marketing instead of grinding away in Photoshop.
How to Pick the Right Partner
Not all editing services are created equal. When vetting providers:
Check their portfolio – look for smooth, natural edges and consistent lighting.
Ask about turnaround – can they handle rush orders or bulk projects?
Test before you commit – many offer free trial edits.
Confirm formats – make sure they deliver in the file types your store requires.
Gauge communication – quick responses and clear instructions are a must.
If you’d like some expert guidance on what to look for before hiring a retouching company, take a look at this helpful guide on choosing a reliable mannequin editing service it breaks down key factors that separate average editors from true professionals.
When Building In-House Makes Sense
If you already have a dedicated retouching team and a constant flow of new products, developing an internal workflow can pay off. You’ll gain full creative control, instant feedback loops, and more flexibility.
But it comes with overhead, equipment, software, training, and salaries. Some brands take a hybrid approach: shoot in-house, then outsource editing during peak seasons.
Pro Tips for Standout Apparel Images
Keep it clean: neutral backgrounds (white or gray) keep the focus on the clothes.
Stay consistent: mark mannequin and camera positions with tape for uniform shots.
Shoot more than you need: multiple angles and close-ups give editors flexibility.
Invest in gear: sharp lenses and high-res cameras = easier edits, sharper results.
Color matters: calibrate monitors and use a color checker for accurate tones.
Don’t overdo it: keep folds, textures, and stitching natural.
Keep learning: workshops, tutorials, and new tools keep your workflow fresh.
Turning Invisible Into Impact
Removing mannequins isn’t just about cleaner photos, it’s about building trust, reducing returns, and boosting conversions. Whether you outsource, build in-house, or mix both, the key is consistency and quality.
With the right workflow and a commitment to detail, this technique can transform your product images from average to catalog-ready, and give your brand a visible edge in the marketplace.