Photo color change is all about adjusting and transforming the colors in your photos to make them look just right. Whether you want to fix a weird color cast, make the colors pop, color correction or completely change the color of an object, photo color change techniques in Photoshop can help you achieve that.
We’ll go into great detail about Photoshop color manipulation in this tutorial. This instructional guide is for everyone who uses Photoshop, whether you’re an experienced photographer trying to improve, a graphic designer trying to improve your work, or a beginner hoping to pick up some new tricks. You will cover all the fundamentals as well as more complex methods, giving you the skills to take on any color problem that comes your way.
Photoshop Keyboard Shortcuts for Faster Editing

Using keyboard shortcuts may speed up your workflow. Here are a few important ones that every Photoshop user on a PC or laptop needs to know :
Selection Tools:
- Move Tool:
V - Marquee Tool:
M - Lasso Tool:
L - Quick Selection/Magic Wand Tool:
W
- Move Tool:
Editing and Adjustment:
- Brush Tool:
B - Clone Stamp Tool:
S - Eraser Tool:
E - Gradient Tool:
G - Hue/Saturation:
Ctrl + U - Levels:
Ctrl + L - Curves:
Ctrl + M
- Brush Tool:
Layer Management:
- New Layer:
Ctrl + Shift + N - Duplicate Layer:
Ctrl + J - Merge Layers:
Ctrl + E - Group Layers:
Ctrl + G - Select All Layers:
Ctrl + Alt + A
- New Layer:
Viewing and Navigation:
- Zoom In/Out:
Ctrl + + / Ctrl + - - Fit to Screen:
Ctrl + 0 - Hand Tool:
Spacebar - Toggle Full Screen:
F
- Zoom In/Out:
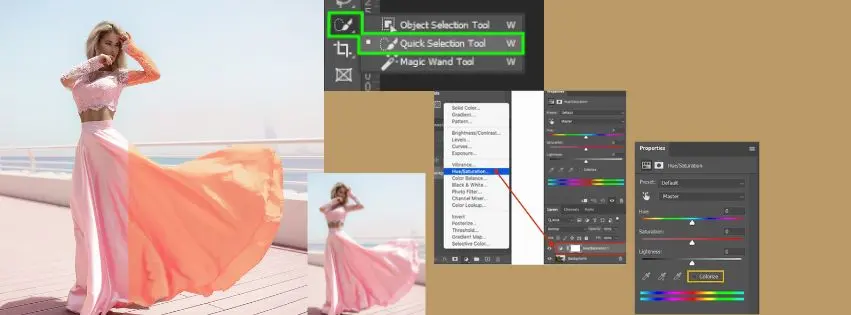
Changing Clothing Colors in Photoshop
Clothing Photo color change is very essential for everyone because ‘photo color change’ can changes your outfits colors!
- Select the Clothing Area: Use the Quick Selection Tool to select the clothing area.
- Refine the Selection: Go to
Select > Select and Maskto refine the edges of your selection. - Add a Hue/Saturation Adjustment Layer: With the selection active, go to
Layer > New Adjustment Layer > Hue/Saturation. - Adjust the Hue: Move the Hue slider to change the clothing color. Fine-tune with Saturation and Lightness sliders.
- Refine the Mask: Use the Brush Tool on the mask thumbnail to clean up the edges.

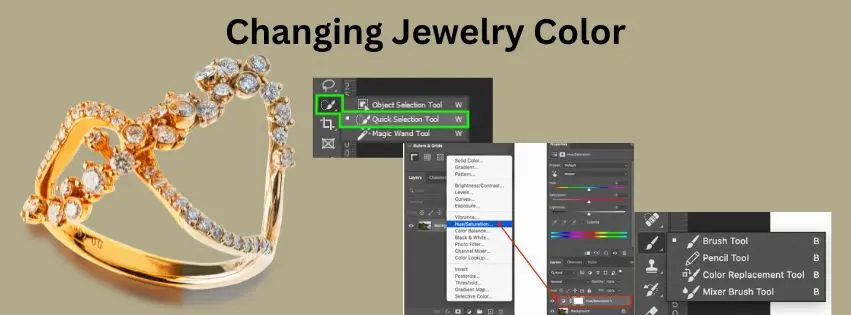
Changing Jewelry Color
Step 1: Select the Jewelry Area: You have to use the Quick Selection Tool to select the jewelry. Click and drag over the area to create a selection. If you select too much, hold the Alt key and click to deselect areas.
Step 2: Refine the Selection: Go to Select > Select and Mask. Use the tools here to refine the edges of your selection. Adjust the Radius and use the Refine Edge Brush Tool to get a clean selection. Once you’re happy with the selection, click OK.
Step 3: Add a Hue/Saturation Adjustment Layer: With your selection still active, go to Layer > New Adjustment Layer > Hue/Saturation. This will create an adjustment layer linked to your selection.
Step 4: Adjust the Hue: In the Properties panel, move the Hue slider to change the color of the jewelry. You can also adjust the Saturation and Lightness sliders to get the exact shade and brightness you want.
Step 5: Fine-tune the Mask: If the color change affects areas outside the jewelry, you can refine the mask. Click on the mask thumbnail in the Layers panel and use the Brush Tool with black and white colors to paint the mask. Black will hide areas of the adjustment, and white will reveal them.
Step 6: Adjust Color Blending: If the photo color change looks unnatural, try changing the blending mode of the adjustment layer. Click on the drop-down menu in the Layers panel and experiment with modes like Color or Overlay until you get a more natural look.

Conclusion
There you have it, then! With this detailed tutorial on Photoshop photo color change, you must be in a position to do it yourself now. These tips and tricks are designed to help the general Photoshop user, whether you are an amateur or professional photographer; they will simply inspire more creativity to transform any photo with simplicity. With this understanding of photo color change basics, you can dive into powerful and non-destructive methods to adjust photos in a way that will help elevate your photography. Keep in mind that practice makes perfect, so do not be afraid to try new things and experiment. Keep exploring from your imagination, and most of all have fun with yourself. Cheers to your edits!


