Upscale images in Canva refer to increasing the resolution or dimensions of a digital image. Upscaling aims to maintain or enhance the quality of the image, avoiding pixelation and blurriness typically associated with simple resizing. Adobe Photoshop is for professionals because professionals work attentively at the appropriate time. But those who don’t have much time and less knowledge about upscaling can use Canva very easily. Canva works like magic without any hard work. If you are searching for software that saves time and works perfectly then Canva is perfect for you. Upscaling images in Canva is a very easy way.
Basic Editing Tips Before Upscale Images
Before you start upscaling, make some basic changes to improve the overall quality of the image. Here are some actions you could take:
Cropping: Remove any unwanted parts of the image. This can help keep your focus on the topic and improve it.
- Open your image in Canva.
- Use the crop tool to adjust the framing of the image.
- Ensure the aspect ratio matches your final output requirements.
By following these basic editing tips, you can significantly improve the quality of your image before upscaling, ensuring the best possible results. Remember, the better your starting image, the better the final upscaled version will be.

Step-by-Step Guide to Upscale Images in Canva
- Access Canva: Open your web browser and go to canva.com. If you haven’t already, create an account or log in to your existing account.
- Log In: Enter your credentials and click on the “Log In” button to access the Canva dashboard.
Creating a New Design: Choosing the Right Dimensions.
Start a New Design: On the Canva dashboard, click on the “Create a design” button located at the top right corner.
Choose Custom Dimensions: To set the specific size for your upscaled image, select “Custom size.”Input choice of pixel width and height.

Uploading Your Image: Importing the Image You Want to Upscale
Upload Image: Select the “Uploads” tab located on the left sidebar.
Import Your Image: To upscale an image from your device, click the “Upload files” option and choose the picture you want to upload. To add a picture to your design canvas once it has been uploaded, click on it.

Resize Tool:
Select your image on the canvas.
Drag the corners of the image to resize it to fit the new dimensions. Hold the Shift key to maintain the aspect ratio.
Position the image within the canvas as needed.

Upscale image:
Click on ‘Edit Image’ you will get many options over there. Scroll down you will get an ‘upscaler image’ option.
Click on ‘upscaler image’ and select your upscale amount after that wait for a while it will take some time.
When it’s done check if the resolution is it ok for you or not. You can change, It is your choice.
Click on ‘Replace’ your upscale image will be ready to download and share.

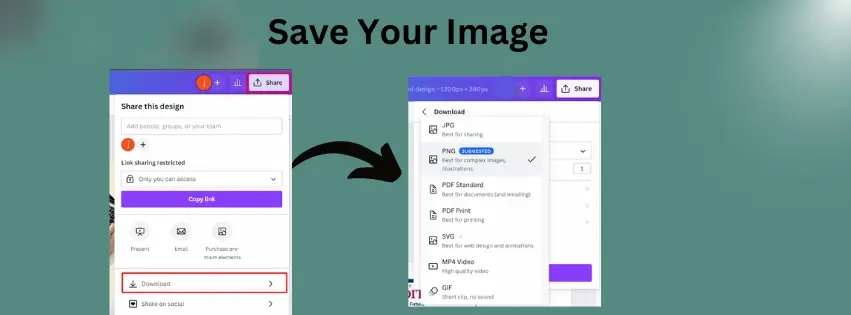
Save Your Image
Once you’re happy with the upscaled image, save it in the desired format. Use File > Save As to choose the best format for your needs, whether it’s JPEG for standard use or TIFF for high-quality prints.

Conclusion
Canva’s Upscale images tool is a simple but effective approach to improve the impact and quality of your visuals. By following the steps given in this guide, you can simply convert your photographs into larger, high-quality copies that are ideal for any project. Clear and exact photographs can make a significant impact while working on social media graphics, business materials, or personal projects.So go ahead and try it! Experiment with different settings, and don’t be scared to try out every tool that Canva provides. You’ll quickly see that upscale images can be a fun and satisfying element of the creative process. Happy designing!


