At first glance, AI upscaling and sharpening feel like the same thing. Both improve image quality. Both make photos look clearer. Both are used in editing workflows. So it’s easy to assume they’re interchangeable. But they’re not. And honestly, this confusion is more common than people admit — especially among beginners and even some intermediate editors.
The difference between AI upscaling vs sharpening becomes very obvious the moment you try to scale an image for real-world use. A photo that looks sharp on a small screen might completely fall apart when enlarged. And a high-resolution image might still look soft if sharpening is poorly applied.
That’s where understanding AI upscaling vs sharpening actually matters — not just technically, but practically.
From the start, many photographers and ecommerce brands rely on advanced editing workflows, such as professional ghost mannequin effects, to maintain clarity and consistency across product images.
And interestingly, both upscaling and sharpening play a role in those workflows — just in very different ways. So in this guide, we’ll break it down properly. Not just definitions, but:
- How each process works
- When to use each
- Why are they not interchangeable
- And where most people get it wrong
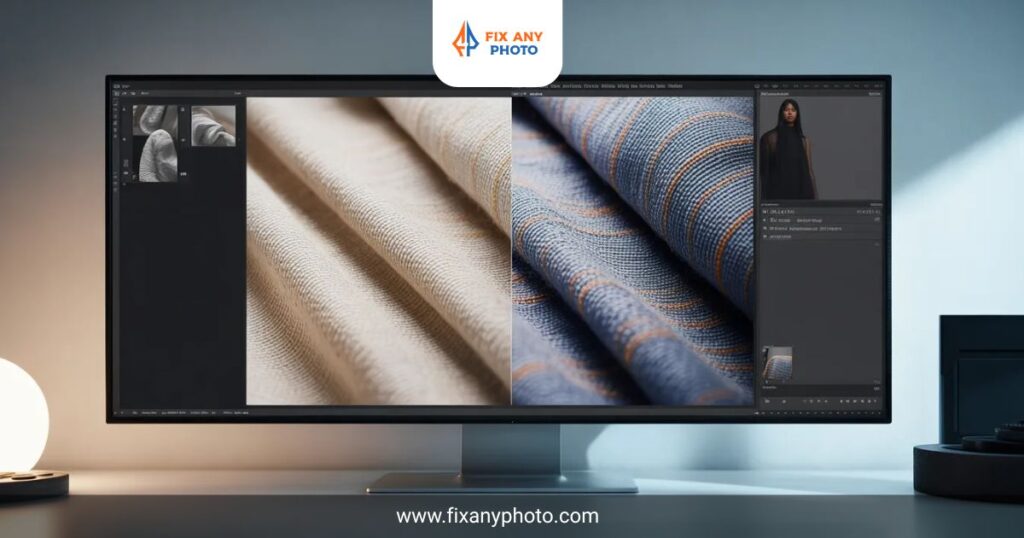
What Is AI Upscaling in Photography?
Let’s start with AI upscaling. At its core, AI upscaling is about increasing image resolution. But not in the traditional way.

Traditional Upscaling vs AI Upscaling
Before AI tools, enlarging an image meant:
- Stretching pixels
- Filling gaps with interpolation
- Result: blurry, soft images
AI upscaling changed that. Instead of just stretching pixels, AI analyzes the image and generates new details. That’s why the conversation around AI upscaling vs sharpening has become more important in recent years — because the tools themselves have evolved.
How AI Upscaling Actually Works
AI models are trained on millions of images. When you upscale an image, the AI:
- Predicts missing details
- Enhances textures
- Reconstructs edges
So instead of simply enlarging the image, it rebuilds it intelligently.
Where AI Upscaling Is Used
You’ll see AI upscaling used in:
- E-commerce product images
- Old photo restoration
- Low-resolution image enhancement
- Print-ready image preparation
And this is where understanding AI upscaling vs sharpening becomes essential — because sharpening alone cannot replace upscaling.
What Is Sharpening in Photography?
Now let’s talk about sharpening. Because this is where many people misunderstand things.
Sharpening Does NOT Add New Pixels
Sharpening works differently. It doesn’t increase resolution. It doesn’t create new data. Instead, it enhances existing edges.
How Sharpening Works
Sharpening increases contrast between adjacent pixels.
In simple terms:
- Edges become more defined
- Details appear clearer
- Image looks “crisper.”
But the actual resolution remains the same.
Why Sharpening Is Still Important
Even in workflows that rely heavily on AI tools, sharpening is still necessary.
Because:
- AI upscaling builds detail
- Sharpening refines it
And that’s where the real relationship between AI upscaling vs sharpening starts to make sense.
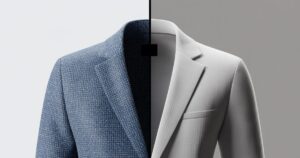
The Core Difference Between AI Upscaling vs Sharpening
Now let’s simplify everything.
Because this is where most confusion disappears.
Quick Comparison Table
Feature AI Upscaling Sharpening
- Purpose Increase resolution Enhance edges
- Adds pixels Yes No
- Creates detail Yes (AI-generated) No
- Improves clarity Yes Yes (visually)
- Use case Enlarging images Refining images
The Simple Way to Think About It
If you had to summarize AI upscaling vs sharpening in one idea:
👉 AI upscaling creates new detail
👉 Sharpening enhances existing detail
Why People Confuse AI Upscaling vs Sharpening
This confusion doesn’t happen randomly.
There are reasons.
Both Improve Image Quality
At a glance:
- Both make images clearer
- Both are used in editing
- Both improve visuals
So it’s easy to assume they do the same thing.
Software Often Combines Them
Many editing tools apply:
- Upscaling
- Sharpening
- Noise reduction
All together.
This makes the distinction between AI upscaling vs sharpening less obvious.
Visual Results Can Look Similar (At First)
On small screens:
- Sharpened image looks “better.”
- Upscaled image also looks “better.”
But once you zoom in or print…
👉 The difference becomes very clear.
A Practical Example (Where the Difference Becomes Obvious)
Let’s say you have a low-resolution product image.
Scenario 1: You Only Sharpen It
Result:
- Edges look stronger
- Image still low resolution
- Details still limited
Scenario 2: You Use AI Upscaling
Result:
- Image becomes larger
- Details reconstructed
- Better for Zoom and print
Scenario 3: You Use Both (Best Approach)
- AI upscaling adds detail
- Sharpening refines edges
This is the real workflow behind AI upscaling vs sharpening.
Why This Matters for E-commerce & Product Photography
This isn’t just theory.
It directly impacts results.
Product Images Need Both Clarity and Resolution
For e-commerce:
- Zoom features require high resolution
- Product pages require sharp visuals
A balanced understanding of AI upscaling vs sharpening ensures:
- Better product presentation
- Higher perceived quality
- Improved conversions
A Small but Important Insight
At some point, most editors realize this:
👉 Sharpening alone cannot fix low resolution
👉 Upscaling alone doesn’t guarantee crisp edges
That’s why understanding AI upscaling vs sharpening is less about choosing one and more about knowing how they work together.
When Should You Use AI Upscaling?
Let’s start with AI upscaling. This is usually the first tool people reach for when dealing with low-quality images. But here’s the thing… Not every image needs upscaling. And using it at the wrong time can actually make things worse.
Use AI Upscaling When Resolution Is the Problem
If your image is:
- Too small
- Pixelated
- Low resolution
- Not suitable for zoom or print
Then AI upscaling is the right choice.
This is one of the clearest distinctions in AI upscaling vs sharpening — sharpening cannot fix resolution issues.
Example: E-commerce Product Image
Let’s say you have:
- An 800px product image
- And your website needs 2000px images
If you only sharpen it:
👉 It will still look low-quality when zoomed
But with AI upscaling:
👉 The image gains resolution + reconstructed detail
That’s where understanding AI upscaling vs sharpening becomes practical, not just theoretical.
Example: Old or Archived Photos
AI upscaling is also useful when:
- Restoring old images
- Enhancing scanned photos
- Improving legacy content
In these cases, sharpening alone doesn’t help much — because there’s not enough detail to enhance.
Print Use Cases
If you’re preparing images for:
- Posters
- Catalogs
- High-resolution displays
AI upscaling becomes essential. Because print requires actual pixel data — not just perceived sharpness.
When Should You Use Sharpening?
Now let’s shift to sharpening. Because this is where people often misuse the tool.
Use Sharpening When Detail Already Exists
Sharpening works best when:
- The image is already high resolution
- Details are present
- Edges just need enhancement
This is a key part of understanding AI upscaling vs sharpening. Sharpening doesn’t create detail — it enhances what’s already there.
Example: Slightly Soft Image
Let’s say your image is:
- Proper resolution
- Slightly soft
- Lacking edge clarity
In this case:
👉 Sharpening improves visual clarity without changing resolution
Example: Final Touch Before Export
Sharpening is often used:
- At the end of editing
- Before exporting images
- For web optimization
This is where sharpening complements AI workflows in AI upscaling vs sharpening discussions.
When You Should Use Both Together
This is where things get interesting. Because the real answer to AI upscaling vs sharpening is often:
👉 Use both — but in the right order
Correct Workflow Order
- AI Upscaling → increase resolution
- Sharpening → refine edges
If you reverse this:
- Sharpening low-res images → poor results
- Then upscaling → exaggerates flaws
Why Order Matters
AI upscaling builds structure. Sharpening defines it. This sequence is critical in any workflow involving AI upscaling vs sharpening.
Real Editing Workflow Example
Let’s walk through a realistic scenario.
Step 1: Start with a low-resolution image
- The image is small
- Slightly blurry
Step 2: Apply AI Upscaling
- Increase resolution
- Restore missing details
Step 3: Apply Sharpening
- Enhance edges
- Improve clarity
Step 4: Final Adjustments
- Color correction
- Noise reduction
- Export optimization
This is the practical implementation of AI upscaling vs sharpening.
Common Mistakes When Using AI Upscaling vs Sharpening
Even experienced editors make mistakes here.
Using Sharpening Instead of Upscaling
This is very common.
Trying to fix the resolution with sharpening leads to:
- Harsh edges
- Noise amplification
- Artificial look
Overusing AI Upscaling
Too much upscaling can:
- Create fake textures
- Distort details
- Look unnatural
Over-sharpening Images
This results in:
- Halo effects
- Grainy textures
- Unrealistic edges
Ignoring Workflow Order
Applying sharpening before upscaling breaks the logic of AI upscaling vs sharpening.
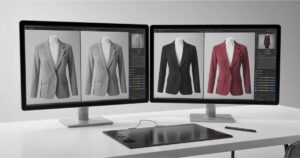
How Professionals Actually Use These Tools
This is something beginners don’t always see.
Professional workflows rarely rely on just one tool.
Instead, they combine:
- AI upscaling
- Sharpening
- Noise reduction
- Color correction
For example, in advanced editing workflows like ghost mannequin effects, both upscaling and sharpening are used to maintain product clarity and consistency.
👉 Ghost mannequin photo editing
A Subtle Insight Most People Miss
At some point, this becomes clear:
👉 Upscaling solves size problems
👉 Sharpening solves clarity problems
And mixing them incorrectly leads to poor results.
Understanding AI upscaling vs sharpening is really about recognizing these two different problems.
Quick Decision Guide
If you’re unsure what to use, ask yourself:
Is the image too small?
👉 Use AI upscaling
Is the image soft but large enough?
👉 Use sharpening
Is the image both small and soft?
👉 Use both (upscale first, then sharpen)
This simple framework helps simplify AI upscaling vs sharpening decisions.
The Technical Difference Between AI Upscaling vs Sharpening
Up until now, we’ve looked at practical usage.
But technically, AI upscaling vs sharpening are built on completely different concepts.
And this difference matters — especially if you’re working on high-quality edits.
AI Upscaling Uses Machine Learning Models
AI upscaling is based on trained neural networks.
These models are trained on:
- Thousands (sometimes millions) of images
- Different textures, edges, and patterns
- Real-world visual data
When you upscale an image, the AI doesn’t just stretch pixels — it predicts what should be there.
So, in the context of AI upscaling vs sharpening:
👉 AI upscaling = data generation + prediction
Sharpening Uses Mathematical Algorithms
Sharpening, on the other hand, is much older.
It relies on:
- Edge detection
- Contrast enhancement
- Pixel-level adjustments
It works by increasing contrast between neighboring pixels.
So, in AI upscaling vs sharpening:
👉 Sharpening = contrast manipulation
Why This Difference Is Important
Because it explains something critical:
👉 AI upscaling can add information
👉 Sharpening can only enhance existing information
This is the core distinction in AI upscaling vs sharpening.
Popular Tools Used for AI Upscaling vs Sharpening

Now let’s talk tools — because this is where most people interact with these concepts.
Tools for AI Upscaling
Some commonly used AI upscaling tools include:
- Photoshop Super Resolution
- Topaz Gigapixel AI
- Let’s Enhance
- ON1 Resize AI
These tools are built specifically for AI upscaling vs sharpening workflows, focusing on increasing resolution while preserving quality.
Tools for Sharpening
Sharpening is available in almost every editing software:
- Photoshop (Unsharp Mask, Smart Sharpen)
- Lightroom (Detail panel)
- Capture One
- Mobile editing apps
These tools are essential in AI upscaling vs sharpening workflows for refining image clarity.
Tools That Combine Both
Modern tools often combine both:
- AI upscaling
- Sharpening
- Noise reduction
Which is why the difference between AI upscaling vs sharpening sometimes feels blurred.
Advanced Workflow (How Professionals Use Both Together)
Let’s move beyond basics. Because professional workflows don’t treat these as separate tools — they integrate them.
Step-by-Step Advanced Workflow
A typical workflow involving AI upscaling vs sharpening looks like this:
Step 1: Image Assessment
- Check resolution
- Identify softness
- Evaluate noise
Step 2: AI Upscaling (If Needed)
- Increase resolution
- Restore missing detail
Step 3: Noise Reduction
- Clean artifacts
- Smooth unwanted grain
Step 4: Sharpening
- Enhance edges
- Improve clarity
Step 5: Final Adjustments
- Color correction
- Contrast tuning
- Export optimization
This layered approach is what makes AI upscaling vs sharpening effective in real workflows.
Quality vs Realism (A Subtle Trade-Off)
Here’s something interesting…Better quality doesn’t always mean better realism.
AI Upscaling Can Create “Artificial Detail”
Sometimes AI:
- Adds texture that wasn’t originally there
- Over-smooths areas
- Creates unrealistic patterns
So while AI upscaling vs sharpening improves clarity, it can sometimes reduce authenticity.
Sharpening Can Look Over-Processed
Too much sharpening can:
- Create halos
- Add harsh edges
- Make images look unnatural
Finding the Balance
This is where experience comes in.
A good workflow balances:
- Detail
- Realism
- Clarity
Which is the real goal behind AI upscaling vs sharpening?
How This Applies to E-commerce & Product Photography
Now let’s bring this back to something practical.
Because for e-commerce, this isn’t just technical — it affects conversions.
Product Images Need Clean Detail (Not Artificial Detail)
In product photography:
- Over-upscaling can misrepresent textures
- Over-sharpening can make products look fake
A balanced approach to AI upscaling vs sharpening ensures:
- Accurate representation
- Clean edges
- Realistic textures
Why This Matters for Editing Services
Professional workflows (like ghost mannequin effects) rely on both:
- Upscaling for clarity
- Sharpening for refinement
Because product images need to look:
- Clean
- Consistent
- Realistic
Common Misconceptions About AI Upscaling vs Sharpening
Let’s clear a few things up.
“Sharpening can replace upscaling.”
- No — sharpening cannot increase resolution.
“AI upscaling always improves images.”
- Not always — poor input leads to poor output.
“More sharpening = better image”
- Over-sharpening ruins quality.
“Both do the same thing.”
- They solve completely different problems.
A Small but Important Realization
At some point, most editors realize this:
👉 AI upscaling is about size and structure
👉 Sharpening is about clarity and edge definition
And once that clicks…The whole AI upscaling vs sharpening confusion disappears.
Final Comparison — AI Upscaling vs Sharpening (Simplified Clearly)
At this point, we’ve gone through everything:
- Definitions
- Use cases
- Workflow
- Technical differences
But let’s simplify it one last time. Because the confusion around AI upscaling vs sharpening usually comes from overthinking it.
Side-by-Side Comparison
Aspect AI Upscaling Sharpening
- Main Purpose Increase resolution Improve clarity
- Adds pixels Yes No
- Creates detail Yes (AI-generated) No
- Improves edges Indirectly Directly
- Best use case Low-resolution images Soft images
- Workflow stage Early Final stage
The Simplest Way to Understand It
If you remember just one thing:
👉 AI upscaling = makes the image bigger and more detailed
👉 Sharpening = makes the image clearer and more defined
That’s the real difference between AI upscaling vs sharpening.
Decision Framework (What Should You Use?)
Let’s make this practical. Because in real editing, you don’t sit and analyze theory — you decide quickly.
Situation-Based Guide
If your image is too small:
👉 Use AI upscaling
If your image is large but slightly soft:
👉 Use sharpening
If your image is small AND soft:
👉 Use both (First upscale, then sharpen)
If your image already looks good:
👉 Minimal sharpening only
This simple framework removes confusion in AI upscaling vs sharpening decisions.
The Most Practical Workflow (Real-World Use)
Let’s put everything into one clean workflow.
Step-by-Step Workflow
- Check resolution
- Apply AI upscaling (if needed)
- Reduce noise
- Apply sharpening
- Final adjustments
Why This Workflow Works
Because it respects the natural order of AI upscaling vs sharpening:
- First build detail
- Then refine it
Reversing this order often leads to poor results.
Where Most People Still Go Wrong
Even after understanding the basics, mistakes still happen.
Over-relying on AI Upscaling
AI can enhance images — but it can also:
- Create fake textures
- Distort fine details
- Reduce authenticity
Over-sharpening Images
This is extremely common.
Too much sharpening leads to:
- Harsh edges
- Halo effects
- Artificial look
Ignoring the Original Image Quality
Both tools depend on input quality. A weak image remains weak — even after processing. That’s why understanding AI upscaling vs sharpening is not just about tools, but about judgment.
How Professionals Think About AI Upscaling vs Sharpening

Professionals don’t ask:
👉 “Which one is better?”
They ask:
👉 “What does this image need?”
That mindset changes everything.
Real Professional Approach
- Analyze the image first
- Identify the problem
- Apply the right tool
- Avoid over-editing
This approach makes AI upscaling vs sharpening feel simple and logical.
Why This Matters More Than You Think
This isn’t just about editing.
It affects:
- Product presentation
- Brand perception
- Customer trust
In e-commerce, especially, image quality directly impacts conversion. That’s why advanced workflows — including services like ghost mannequin effects — combine multiple techniques (including upscaling and sharpening) to deliver consistent results.
Key Takeaways
- AI upscaling vs sharpening solves two different problems
- AI upscaling increases resolution and builds detail
- Sharpening enhances clarity and edges
- Both tools work best when used together
- Workflow order matters (upscale → sharpen)
- Overuse of either tool reduces image quality
- Real results come from balance, not tools alone
FAQs
What is the main difference between AI upscaling vs sharpening?
- AI upscaling increases image resolution by adding new details, while sharpening enhances existing edges without increasing resolution.
Can sharpening replace AI upscaling?
- No, sharpening cannot increase image size or resolution. It only improves edge clarity.
Should I use AI upscaling before sharpening?
- Yes, the correct workflow is to upscale first and then apply sharpening.
Does AI upscaling always improve image quality?
- Not always. If the original image is very poor, AI upscaling may create unrealistic details.
Can I use both AI upscaling and sharpening together?
- Yes, and this is often the best approach for achieving high-quality results.
Which is better for e-commerce images?
- Both are important. AI upscaling ensures high resolution, while sharpening improves clarity and presentation.
Final Thoughts
If you look at it simply, the debate around AI upscaling vs sharpening isn’t really about choosing one over the other. It’s about understanding what your image actually needs.
- Sometimes it needs more detail.
- Sometimes it needs more clarity.
- And sometimes… it needs both.
The moment you start thinking that way, editing becomes easier — and results become more consistent. And in the end, that consistency is what actually matters.